

COSTUMES
Star Wars Return of the Jedi:
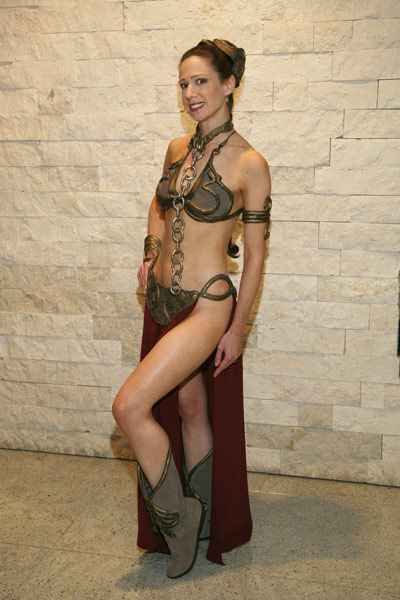
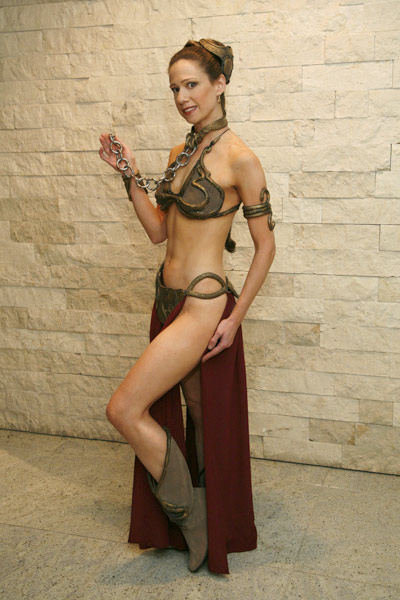
Princess Leia - Jabba's Slave
July 2009
 |
 |
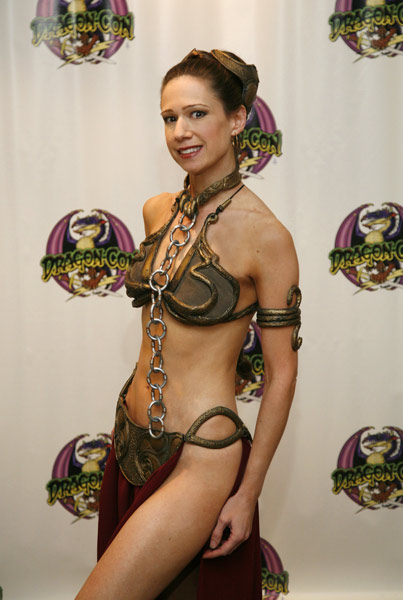 |
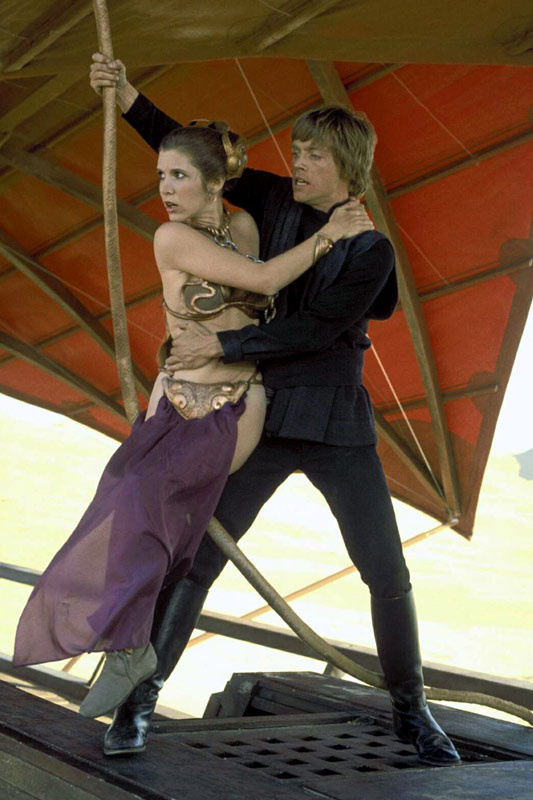
Leia's infamous metal bikini costume is something I honestly said I'd never wear. I felt I couldn't wear it because it just wasn't a costume that suited my looks, and I generally do not feel comfortable in revealing clothing. So why did I finally give it a try? Year after year, I found myself disregarding my resolution to become more physically fit. Knowing that I should exercise and eat right for health reasons just wasn't enough to make me change my habits. I really needed something to scare me into it! Wearing this 'metal' bikini in public was the scariest thing that came to mind. I also knew it might be a fun adventure - you only live once.
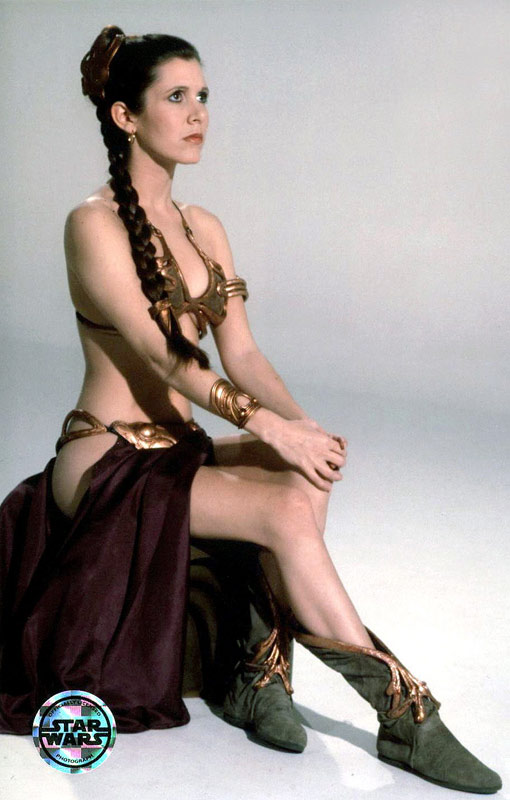
I subsequently read this recollection from Carrie Fisher in Wookieepedia, and thought it was hilarious because I could absolutely relate to it:
Prior to the filming of Return of the Jedi, Lucas invited Fisher to San Francisco to show her a picture of the costume. Fisher said he showed her the picture "to frighten me into exercise, I think. He succeeded."
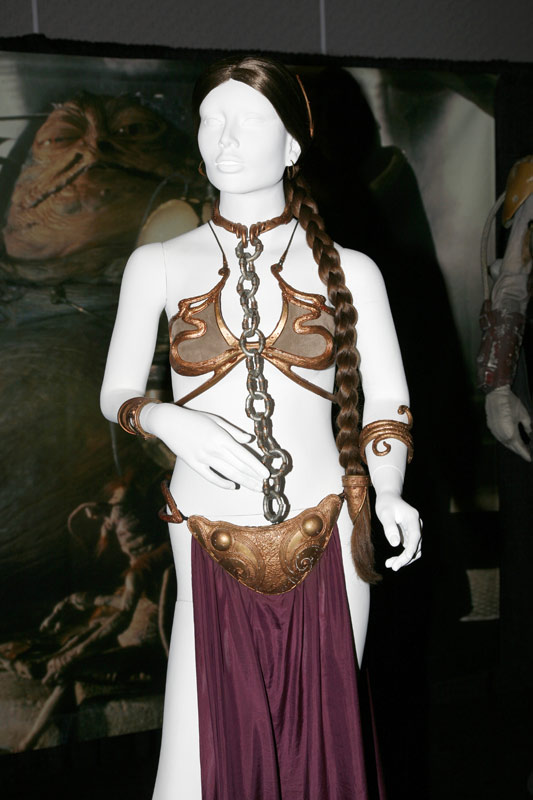
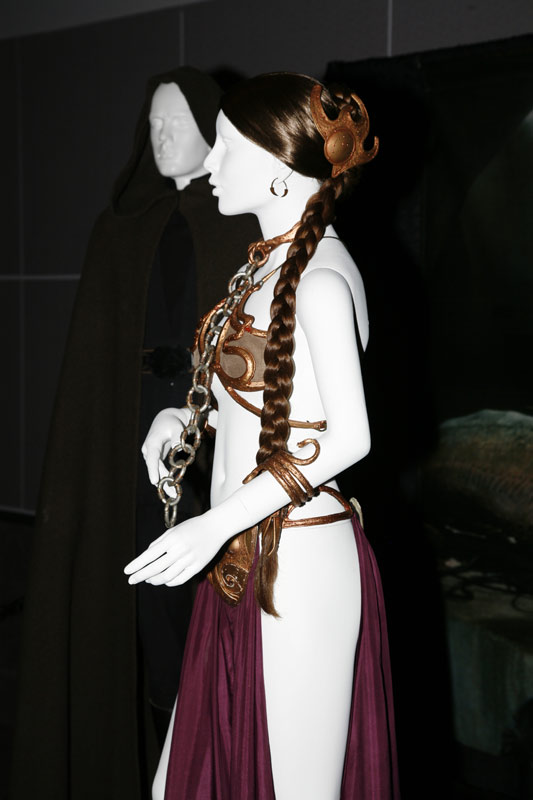
Reference Photos
 |
 |
 |
 |
 |
 |
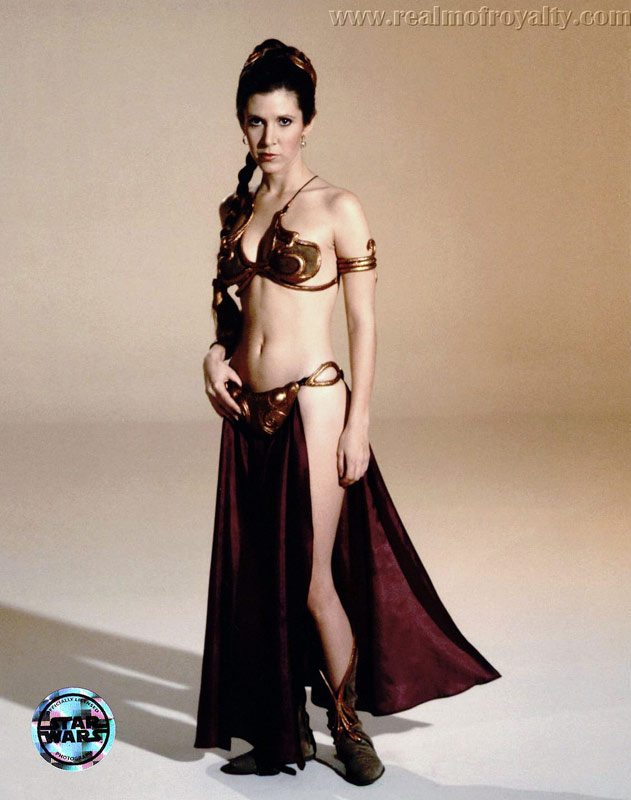 |
Additional reference photos can be found at The Padawan's Guide, Leia's Metal Bikini,
and at Kay Dee's CIV Photo Site.
Below you'll find some tips and tricks for wearing this costume, as well as research notes.
KITS | FITTING | SKIRT | CHAIN LINKS | UNDERGARMENTS | KEEPING PARTS IN PLACE | BOOTS | HAIR
EARRINGS |PAINT| STORAGE
BIKINI KITS:
I did not sculpt the hard parts of this costume (with the exception of the chain links, which I document below). I purchased a used costume originally sculpted by the talented costumer, Darcienne. She does not seem to be making the costume on a regular basis any longer (perhaps one costume now and then), so Jamin at Leia's Metal Bikini is of the current regular sources for bikini parts. The Darcienne kits are painted an antique gold/brass, and while it is not a spot on match to the coppery bronze color of the screen used bikini, I feel it is a great looking paint scheme.
Tutorials: If you are a do-it-yourself costumer and are looking for tutorials on how to sculpt your own bikini from scratch, please visit Princess Tanya's site, Rachel's Blog, KimnCris' tutorial on making a bikini from Sintra, and the Slave Bikini Builders Club.
FITTING THE BIKINI :
The Darcienne bikini top, boot toppers, and snake arm band are all constructed out of what appears to be flexible urethane rubber, covering a support structure of heavy armature wire. This means all of these parts can be bent into shape. If the arm band is too large, it can be sliced with an Exacto knife down to size (the remaining wire bits are then cut off with wire cutters). Any hard plastic resin parts (this would be all Jamin kit parts, the Darcienne bikini bottom and wrist band) can be heated with a hair dryer and bent to fit. I had to flatten out my front and back plates to match the shape of my body a bit better so they wouldn't gap outward. It took a few tries, but I repeatedly held the front plate on the carpet, heated it, bent it slowly, then held it up to see if it fit correctly. If it needed more bending one way or another, I just heated it again, carefully bent it, and kept repeating this process until I was pleased with the shape and fit. If the wrist bracelet is too tight, it can be heated and bent open a bit so it will fit over the wrist.
THE SKIRT:
After seeing this costume on display twice in Los Angeles, my best guess as to the type of fabric used on the skirt is a heavier weight Habotai Silk. The color is closest to "Purple Potion" from the Pantone for Fashion and Home guide ("Amaranth" is close too). I purchased 15.5mm weight Habotai from Thai Silks which would need to be dyed, but ran out of time to continue my dye tests to get the color dark enough (use black in your dye mix!). I purchased some pre-dyed silk crepe de chine as a quick substitution. The color is not perfect nor the texture, but it's close enough for now.
I believe the skirt is a straight rectangular panel that is gathered at the top (I made mine with a very slight A-line, but now realize it is not needed). I sandwiched the gathered edge into a 2" yoke casing (or waist band), added velcro all along one side of the yoke, and stuck it to the inside of my resin bikini bottom panels.
 |
SKIRT ATTACHMENT |
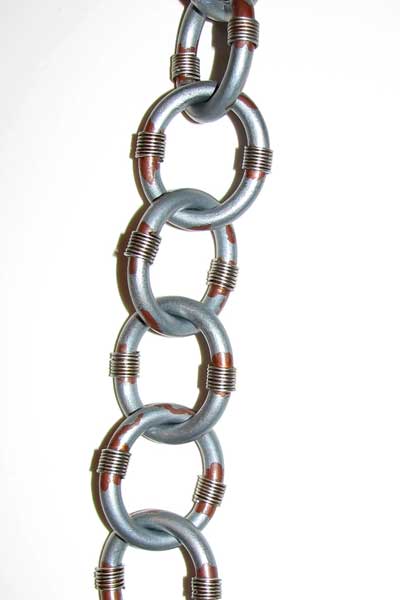
CHAIN LINKS:
Some kits come with chain links, some people purchase chains from hardware stores, others paint shower curtain rings and link them together. My kit was missing the chain links, so I decided to sculpt my own based off of photos from the exhibit. I started out with clear flexible plastic tubing from a hardware store, cut it to length, and made an oval out of it by connecting the ends with a styrene rod. I then made a few RTV molds and cast multiple resin chain link pieces. After a lot of sanding, filling, and painting, (I never perfected the paint color) they were linked together and finished off with the wrapped wire decorations. The top link is actually split in half so it can open up and connect to the collar. I very carefully drilled small holes in each of the 4 open edges of the split chain link, and inserted small rare earth magnets. So the top link pulls apart, then sticks back together with magnets.
 |
 |
 |
||
MOVIE CHAIN |
MY CHAIN |
MAGNETIC CHAIN OPENING |
UNDER GARMENTS :
BIKINI TOP:
As structured as the top looks, it really is not designed like a true bikini top or bra and really does not give a great deal of support, or reliable coverage. Even Carrie Fisher recalls that there were costume malfunctions on set (story from Wookieepedia).
The metal framework that held the top together did not move well with the costume, and it proved difficult to keep the costume in place during filming; several scenes had to be re-shot due to "wardrobe malfunctions."[5] Fisher did not believe in the industry standard solution of using double-sided tape, so it became necessary for a wardrobe person to check whether her breasts were still secure and snug within the costume top after each take. Fisher said the costume "drove the wardrobe person nuts."
Some of the problems may be due to the fact that these are 'a few sizes fit most' kits. I did attempt to add padding to my Darcienne top in hopes of adding some extra lift, but it only resulted in pushing the top away from my body. I found the only way to add some emergency coverage and a little bit of support was to apply the Dritz self adhesive bra (these bandage style pasties used to be available at JoAnn's. I'm unclear if they have been discontinued). I usually apply the self adhesive bra, lay my bikini top over it, and trace with a pen where I need to trim away parts of the adhesive bra so it will not show.
BIKINI BOTTOM: There are a few options with this. (I am paranoid, so I often combine option # two with # one.).
Option One - wear a thong (nude or burgundy colored could work well) underneath. In order to prevent the side straps from showing, cut off the elastic sides from a store bought string thong (such as Victoria's Secret Cotton V-String) and sew in clear elastic. My Diva's Closet also sells thongs with clear elastic straps. A bit of double sided fashion tape can be used to secure the clear elastic directly under the oval side straps of the 'metal' bikini bottom so they don't show.
Option Two - for more coverage, you can make a string bikini bottom out of a stretch Lycra fabric that matches closely in color to your skirt panels. I modified McCall's Pattern M5861 view A (I highly suggest making a few mock-ups and getting the shape just right for your costume). Leave off the elastic sides, and attach the front and back of the modified bikini bottom with Velcro (and a few snaps if you wish) to the inside of your metal bikini. (It may actually have to attach to the skirt which has already been secured to the inside of the plastic bikini plates with velcro.) If you can't sew, try a string bikini bottom, either swim wear or lingerie, and cut off the elastic sides. If you experience bikini creep, add a little fashion tape or toupee tape.
Option Three - Jamin at Leia's metal bikini suggests the "C String". I'm not sure how reliable it is, and it's definitely very minimal on coverage. But it is better than going with nothing.
GETTING THE PARTS TO STAY IN PLACE :
ADHESIVE TAPES:
Toupee tape is your friend. It has much more staying power than fashion tape. I've found it is helpful to apply toupee tape to the outer upper edge of the back skirt panel to prevent flashing people as you walk, as well as just inside the upper outer edges of the front panel of the skirt (below the metal bikini plate). If you wear a thong with clear elastic straps under your skirt, you can keep the elastic straps hidden directly behind the oval side straps of your bikini by sticking the clear elastic onto the resin (plastic) with a thin strip of clear fashion tape (thanks to Shea for that suggestion).
I use a combination of red toupee tape and blue toupee tape. It is all clear double sided tape, but the 'red' tape is marked with red peel away backing, and 'blue' tape is marked with blue peel away backing. The two types of tape must be layered together. The blue tape is very long wearing and stays put on the skin, but if it comes in contact with your fabric you will never get the adhesive off completely and will be left with a sticky mess on your skirt panels or bra top. The red tape is a less tacky. It's strong enough to make a good bond to your fabric but not strong enough to stay put on the skin very long. Thus, I layer the tape with the red tape being stuck to my fabric, the blue tape is then placed on top of the red tape, and it is the blue tape that contacts the skin.
I have found the 1" red tape strips combined with the 3/4" blue strips are the most convenient. I peel away the non-colored side of the backing and stick a blue strip to a red strip (this way I can still see which side is the red side and blue side and I'm sure to apply the red side of the tape to my fabric first). I can carry a few spare strips in my boot for emergency re-applications through the day, but I often don't need it unless I've had the costume on for over 4 hours or so.
Toupee tape can be used on the bikini top as well. If you find it shifts or gaps away from your body when you bend forward, put some toupee tape inside on the leather cup. I would first suggest gluing in some smooth fabric to the inside of the leather to provide a good surface to peel the tape on and off of. I used tanners bond leathercraft cement by Tandy. You have to be careful not to over saturate the fabric because you don't want the glue to seep through to the front of the leather and show on the outside. Just apply a thin even layer. Please note, if you are using a thinner faux fabric suede like ultrasuede or microsuede on your top, you may not be able to glue smooth fabric strips onto the inner surface. The glue might seep through to the front and show. So please test it on a spare scrap of ultrasuede first.
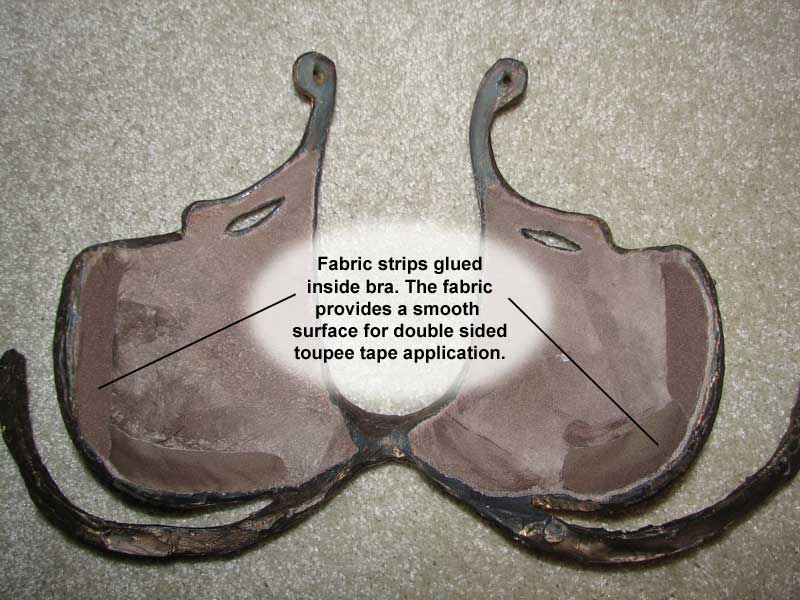 |
FABRIC STRIPS INSIDE BRA |
LOCKING THE BIKINI BOTTOM SCREWS: I don't know how the bikini bottom parts are held together on a Jamin kit, but the Darcienne kits use leather tabs that are held in place with chicago screws. In order to take the bikini on and off, only one screw ever needs to be undone. So once you have adjusted your leather tabs to a length that will fit, it is imperative that you lock all of the screws in place with thread lock glue (Loctite is one brand). Otherwise, you will risk a serious costume malfunction once a screw works its way loose (I've witnessed it). I don't suggest using permanent glue (like super glue) because if you ever need to readjust your costume or replace the leather tabs you can't. Thread lock will hold, it's made for automotive use and available at hardware stores. The only screw you won't lock into place is the one that has to be undone to get in and out of the costume. Just make sure you really fasten it tightly with a small screwdriver. If you need to, keep a little screwdriver in your boot so you can periodically make sure the post is tight through the day as you wear it.
FASTENING THE BIKINI TOP STRINGS: I use black 3/32" Superior Leather Lace from Tandy, rather than thicker suede lacing. It is sturdier (it doesn't tear as easily) and thinner so it can be knotted several times. I have permanent triple knots on the lower part of the bikini straps, and they are secured with super glue. The straps cross over the back, and the top is tied and untied at the front near the neck. I'm able to make 5-6 knots and then slip the decorative cone shaped bead over the knots (Jamin's beads are smaller, so you may only be able to make a few knots if you have his kit). I image that over time, the leather may wear thin and break - so replacing the laces every few years to keep them strong can't hurt.
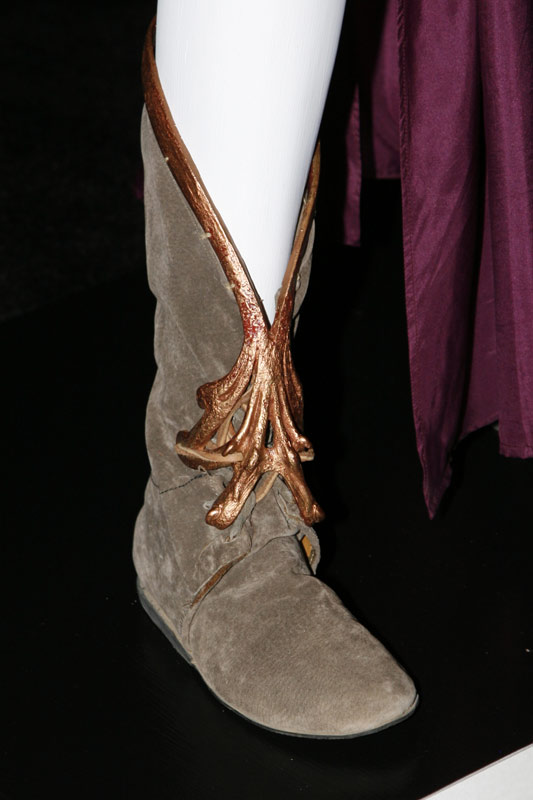
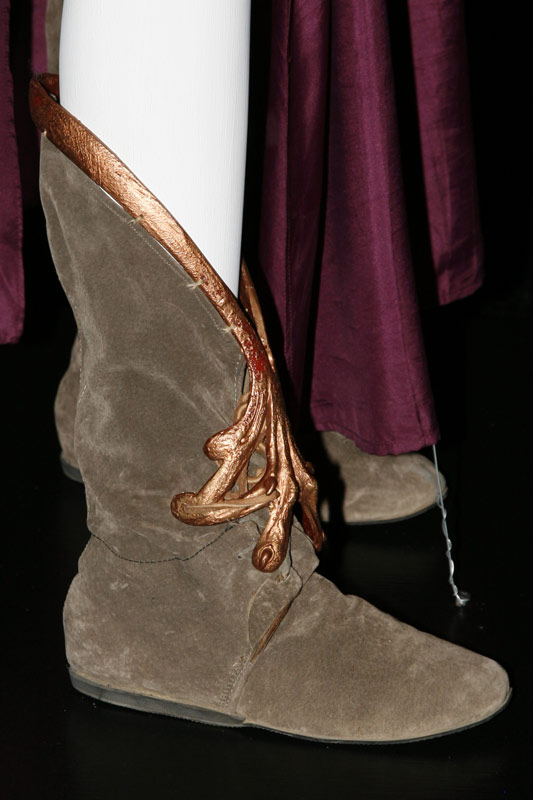
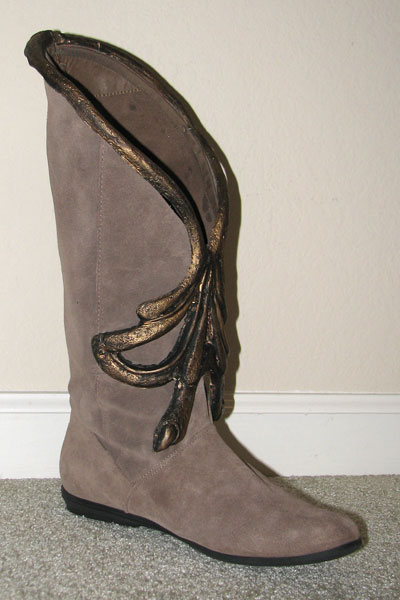
THE BOOTS:
Leia's shoes are a flat soled moccasin style suede boots. You can make out the laces underneath the decorative boot toppers. Some girls purchase boots and cover them with suede (or faux ultrasuede cloth) to replicate this moccasin look (See Kristin's boot tutorial). I used Steve Madden "Arkansas" style boots from QVC (there still some sizes left on Amazon). The suede color is a fairly close match to the pantone match I made at the CIV exhibit. If these boots had not been available, I would have settled for the Steve Madden Bonanza tall shafted boot in gray, even though it was leaning a little too gray as opposed to taupe.
Although the boots should be a little slouchy, mine were too slouchy in back and not holding up to the weight of the boot topper. I sewed a fabric casing strip, and inserted metal corset boning down the back length of the boot to give it a little more stiffness and prevent it from falling down.
The boot toppers are simply sewn on in a few spots with thread that matches the boot (I happened to use clear thread). You'll need to first carefully mark a V shape with a white chalk wheel (don't use blue, it won't come out) and cut out the top edge of your boot. If you are lucky, that leftover suede can then be used in your bikini top!
 |
 |
 |
||
CIV EXHIBIT |
CIV EXHIBIT |
MY BOOT |
Do the leather boots match the leather top? There seems to be a never ending debate as to whether the boots match the bikini top suede. There are also debates about the original color of the suede used in the movie for the boots and bikini. Some fans report that they've been told by inside curator/archivist sources that the original suede used in Return of the Jedi deteriorated and had to be replaced with a close, but perhaps not exactly identical color. So the original boots and bra suede may have been more grayish-brownish-olive. It's anyone's guess since the original suede may no longer exist and photo processing can drastically shift color appearance (Example: many fans know that Han's snow jacket appeared blue in Empire Strikes Back, but in reality it is brown).
For what it's worth,
the evidence I have from the exhibit is that it does look like a matching color. But I guess anything I obsereved would be tossed out if the boots and suede in the bra are not original. In any case, I was doing pantone matching from my color guide, and I kept coming up with the same colors for the top and the boots ("Stucco" from Pantone for Fashion and Home Guide was closest, but a bit too light and missing a touch of yellow warmth.). I did not get a close enough look to see if it is in fact the same exact leather on both the bikini top and boots, it could be leather that's just very close in color. I'm aware that in the movie and other photographs from Return of the Jedi, the boots often look like a different color than the top. My only theory about that that it's due to the lighting and the tricks it plays on the nap of suede. At the exhibit, if I looked at the boots from one direction they appeared darker, at another angle they were lighter. If the costume was photographed in the movie or studio so her skirt created a shadow over the boots, they would appear darker than her top. Some speculate or have beeen told that the leather was changed in the bra for the exhibit (Others have suggested the boots were re-made too). Others speculate that the top faded.
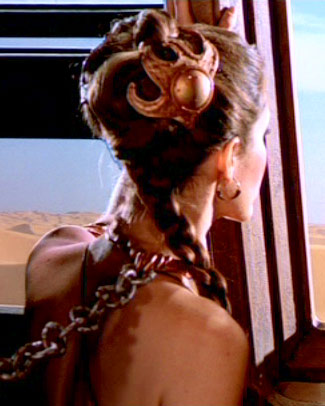
HAIRSTYLE:
Leia wears a long braid topped off by a large bun on the top of her head that is reminiscent of the cinnamon buns from A New Hope. The bun is not braided, but rather, a two stranded twist (view twist tutorial) as seen in this photo. I happen to use Look of Love Braided Switch 214 for the braid (I re- braided it more tightly). Depending on my mood, I alternate between sometimes using a Look of Love Braided Switch 246 (which was unbraided and made into a two stranded twist) for my bun, or the Look of Love Long Reversible Clip-on Hair Extension. I removed the jaw clip and relied on the draw string to wrap this hair piece on top of my own small hair bun. It's then twisted into a larger cinnamon bun.
 |
 |
|
HAIRSTYLE FRONT |
HAIRSTYLE BACK |
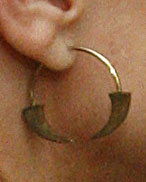
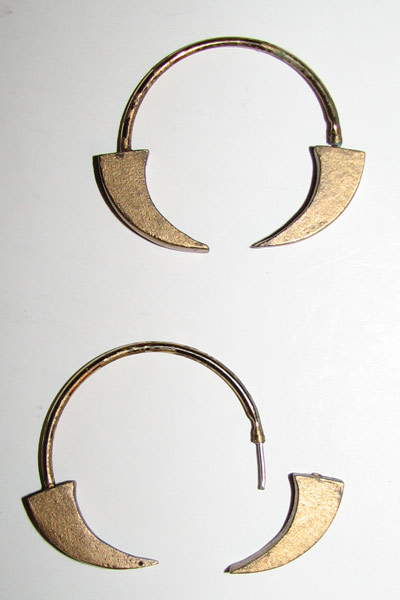
EARRINGS:
Leia wears gold hoop earrings with decorative claw or tooth like details. Ever since I saw the earrings at the exhibit in LA I wanted to make them (in fact, maybe it was this hidden desire to make the earrings that also lead me to wearing the costume?) I found the small detail to be a fun challenge since I didn't believe anyone had made the earrings before. I used thin inexpensive faux gold hoops purchased from a beading/jewelry craft supply store. Half of an end was carefully sawed off with an Exacto saw blade (cutting it with wire cutters crushed the metal). I carefully cut the claw shape out of a styrene strip. The shape was cast in an RTV mold, resin duplicates were made, painted, and attached to the gold hoops.
 |
 |
 |
||
MOVIE EARRING |
MY EARRING |
MY EARRINGS |
TOUCH UP PAINTING:
Over time, paint will peel and chip off of your 'metal' bikini. Particularly the flexible rubber parts of a Darcienne kit (I can't speak for a Jamin kit as I don't own one). The original kits (Jamin's and Darcienne's) are spray painted, but touching up spots with spray paint is not feasible. I found a brush on acrylic paint that blends perfectly with the paint used on Darcienne kits. It is Studio Bronze by Lascaux Pale Gold 991 . You will first need to peel off any loose paint in your chipped/damaged area. Clean it with a bit of rubbing alcohol or Polly S Plastic Prep. Be sure to mix your paint well (the darker pigments really settle to the bottom of the bottle). Dab full strength paint in the chipped spots with a brush. Once that dries, water down a bit of the gold paint, and blend a sheer wash of gold paint out over the edges of the the non-chipped parts so there is no longer a harsh edge or line of bright gold. After that dries, antique it with Lascaux Studio Acrylic in Oxide black 972. You'll need to water it down a bit to make an antique wash, brush it on, then wipe off to reveal highlights. Repeat any areas (like crevices) where you'd like to have more shading.
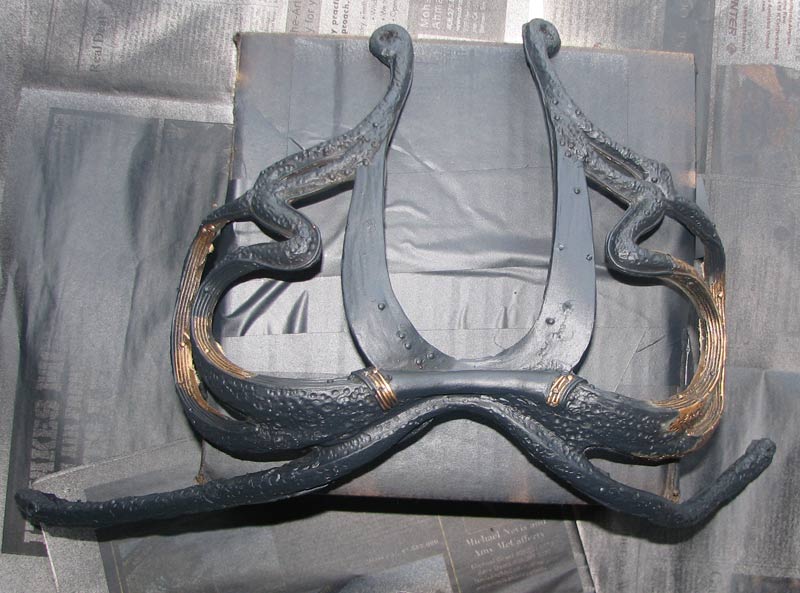
REPAINTING:
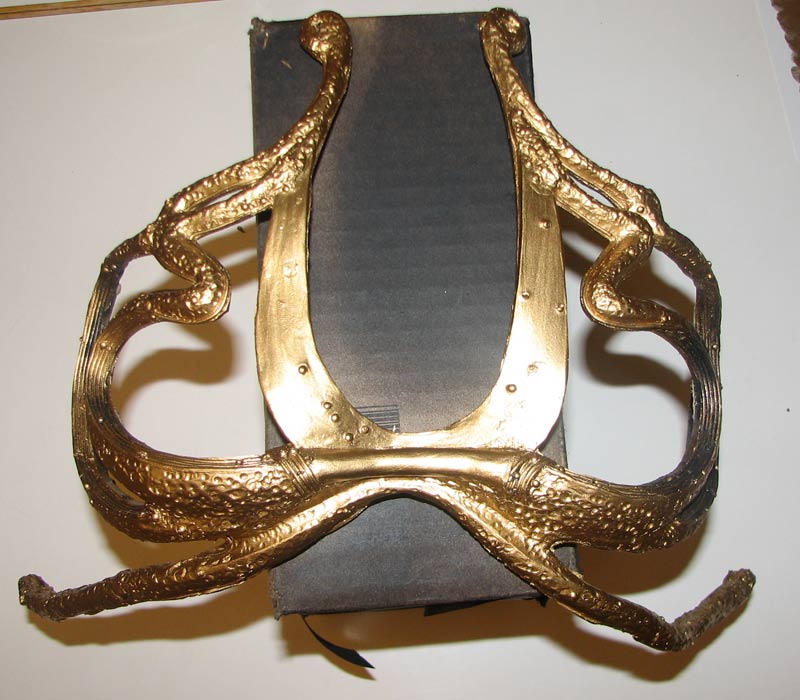
If a costume piece has gotten a lot of wear and tear, sometimes an entire piece may need repainting. This was the case for the used bikini top I had purchased. I don't know if it had gotten bent at some time, or if it was just normal wear and tear, but the paint was loose, cracked, and peeling off all over the bra and I had no choice but to peel virtually all of the paint off, remove the original leather (there was no no safe way to spray paint the bra and keep the original leather inside) clean the surface with Polly S Plastic Prep, and repaint it. The urethane rubber is a little difficult to get paint to stick to, so I first spray painted the structure with clear adhesion promoter made by Duplicolor (available at auto supply stores). Next, I applied a base coat of black bumper paint, which is formulated to be flexible, resistant to cracking, and adhere well to plastics. I then brushed on Studio Bronze by Lascaux Pale Gold 991 and once this was dry, antiqued the bra by brushing on and wiping off a sheer wash of Lascaux Studio Acrylic in Oxide black 972. After 3 wearings it has held up OK, but the flexible straps are cracking and starting to peel in spots so I suppose those will just need continual touch ups.
 |
 |
 |
||
PAINT STRIPPED |
BUMPER PAINT BASE |
GOLD ACRYLIC |
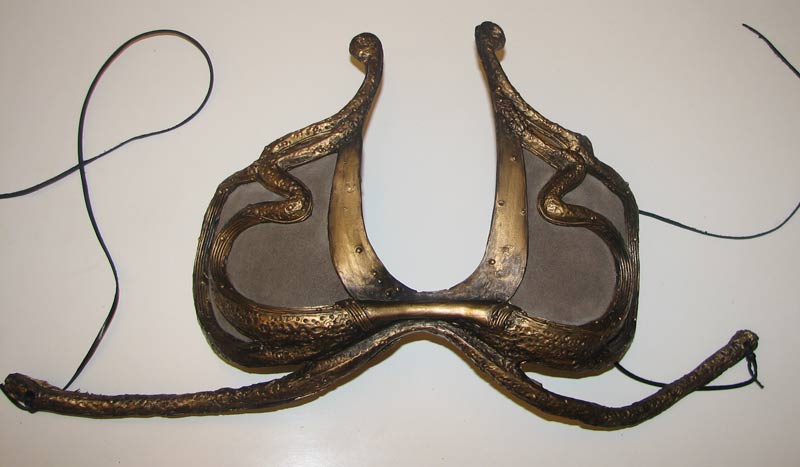 |
FINISHED WITH BLACK WASH |
After the top was re-painted, I inserted the leftover leather from my boots, using super glue gel as the adhesive. A gel is easier to work with than regular super glue because it doesn't run (thanks to Jamin for this tip). Actually, before I inserted the leather I decided to darken it a tad, as the color visually looked too pale in contrast with the darker bronze paint style. I mixed brown and black jacquard fabric paint, and watered it down. It was literally, mostly water with a little paint tinting it. I brushed the tinted water solution on the leather with a sponge applicator so the leather was saturated evenly. I then took a toothbrush, and brushed over the suede as I dried it with a hairdryer. After gluing in the seude slowly a section at a time, I used an exacto knife to cut out the suede from the decorative openings near the top of the bra.
TRAVELING AND STORAGE :
All of the parts are very fragile and can either be bent out of shape or broken if they are not stored and packed carefully when traveling. I happen to pack the top in a large shoe box, which is then put inside a medium plastic storage box of a similar size. A few of the smaller accessories such as the hair combs, and choker can fit in this box. It's been sturdy enough to put in my checked luggage. I store the suede boots with toppers attached, and the bikini bottom in a slightly larger plastic storage box . The plastic storage boxes need to be sturdy, make sure you don't get one that is flexible if you push down on the top of the lid or the sides.
Back to Costumes Index >